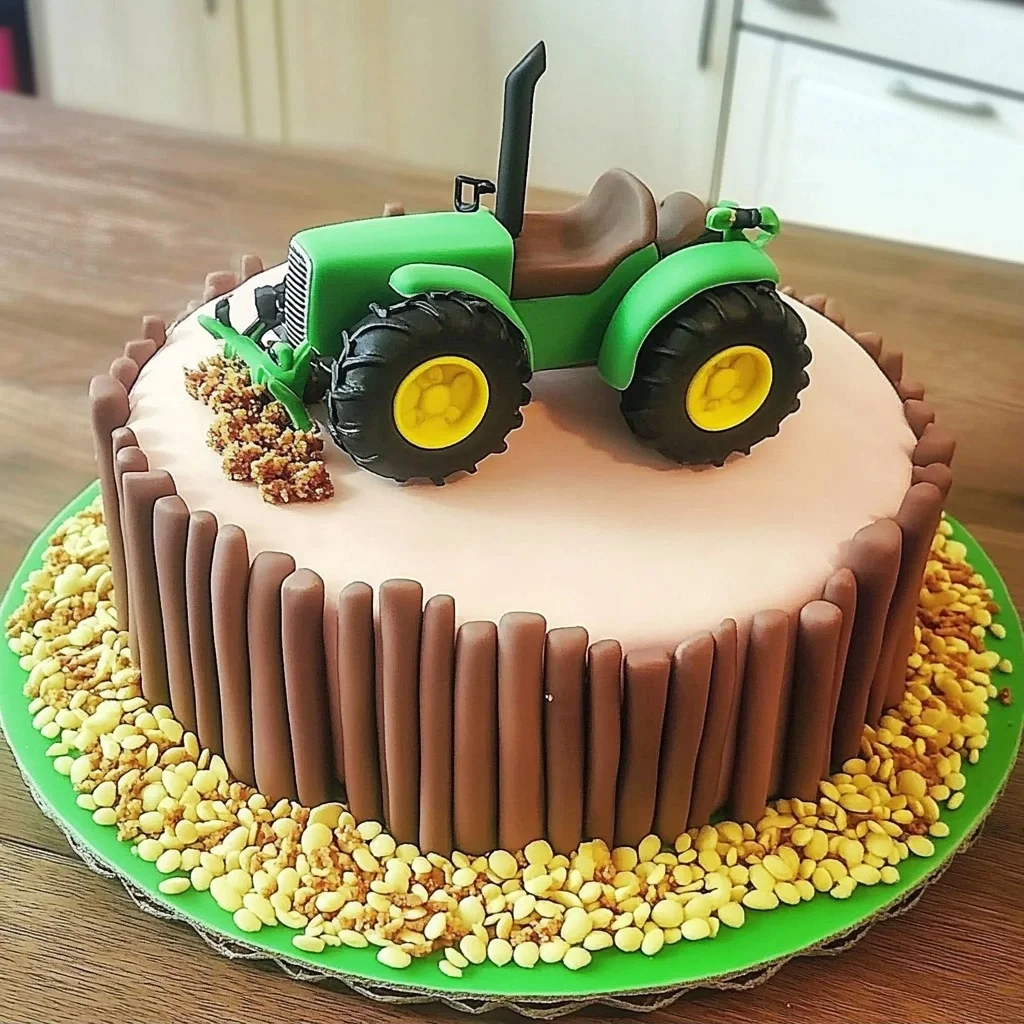
Imagine the joy of slicing into a vibrant green tractor cake, where the sweet aroma of vanilla wafts through the air, mingling with the rich chocolate ganache that drapes over its contours like a shiny tractor finish. This delightful creation not only dazzles the eyes but also promises an explosion of flavors that will have everyone racing back for seconds—perfect for a child's birthday or a whimsical farm-themed gathering.
As I recall my own son's birthday party, where this tractor cake became the star attraction, laughter and excitement filled the room as little hands eagerly reached for a slice. Each bite is a celebration of creativity and joy, making it an ideal centerpiece for any festive occasion. Trust me, serving this cake will turn any event into a memorable adventure on the farm!
Why Is tractor cake So Irresistibly Good?
Delightful design: This vibrant tractor cake is not just a dessert; it’s a centerpiece that sparks joy at any children's party or farm-themed celebration.
Deliciously rich: With layers of moist chocolate cake and creamy frosting, every bite is a heavenly combination of flavors that both kids and adults adore.
Easy to customize: The fondant decorations allow for endless creativity, making it simple to personalize for the birthday child or event theme.
Quick prep time: In just 30 minutes of prep and 45 minutes of baking, you’ll have a stunning cake ready to impress your guests.
Crowd-pleaser: Its charming look and irresistible taste guarantee smiles all around, making it the star of the party!
tractor cake Ingredients
- For the Batter
- 2 cups all-purpose flour – This forms the base of your tractor cake, giving it structure and a delightful crumb.
- 1.5 cups granulated sugar – Sweetens the batter beautifully, balancing the rich cocoa flavor.
- 1 cup unsweetened cocoa powder – Provides that deep chocolatey goodness, making every bite indulgent.
- 1.5 teaspoons baking powder – Helps the cake rise, ensuring a light and fluffy texture.
- 1.5 teaspoons baking soda – Works alongside the baking powder for added lift and perfect crumb.
- 1 teaspoon salt – Enhances all the flavors and balances out the sweetness in your cake.
- 2 large eggs – Binds the ingredients together while adding moisture to the cake.
- 1 cup milk (whole or 2%) – Adds richness and moisture; you can use any type of milk you prefer.
- 0.5 cup vegetable oil – Keeps the cake moist and tender; feel free to substitute with melted butter if desired.
- 2 teaspoons vanilla extract – Infuses a warm, comforting flavor that complements the chocolate perfectly.
- 1 cup boiling water – This unique addition helps to enhance the cocoa flavor and creates a moist texture in your tractor cake.
- For the Frosting
- 1 cup unsalted butter (softened) – Serves as the creamy base for your frosting; make sure it's at room temperature for easy mixing.
- 4 cups powdered sugar – Sweetens and thickens your frosting; sifting it first ensures a smooth consistency.
- 0.5 cup unsweetened cocoa powder – Adds extra chocolate flavor to your frosting, creating a rich topping for your cake.
- 0.5 cup milk – Adjusts the consistency of your frosting, making it spreadable but still thick enough to hold its shape.
- 2 teaspoons vanilla extract – Adds a beautiful depth of flavor that enhances the overall taste of your frosting.
- For Decoration
- 1 package green fondant – Perfect for creating grass or leaves on your tractor cake, adding a fun touch to your design.
- 1 package black fondant – Ideal for making wheels or details on your tractor, giving it an authentic look.
- 1 package red fondant – Use this to craft the main body of your tractor; it's sure to delight young guests!
- 1 package yellow fondant – Great for adding accents like headlights or decorative touches on your tractor cake design.
Step-by-Step tractor cake

1. Preheat the oven to 350°F (175°C). Start by greasing and flouring two 9-inch round cake pans to ensure your delightful cake releases easily after baking.
2. Combine the dry ingredients in a mixing bowl: 2 cups all-purpose flour, 1.5 cups granulated sugar, 1 cup unsweetened cocoa powder, 1.5 teaspoons baking powder, 1.5 teaspoons baking soda, and 1 teaspoon salt. This mixture will create a rich chocolate base.
3. Add the wet ingredients: incorporate 2 large eggs, 1 cup milk (whole or 2%), 0.5 cup vegetable oil, and 2 teaspoons vanilla extract into the dry mix. Stir until everything is well combined and smooth.
4. Stir in the boiling water slowly — about 1 cup — to achieve a silky batter that enhances moisture and richness in your tractor cake.
5. Divide the batter evenly between your prepared cake pans and watch as it fills them beautifully, ready to transform into a fun tractor shape.
6. Bake for 30-35 minutes or until a toothpick inserted in the center comes out clean. The cakes should rise nicely and have a sumptuous aroma.
7. Cool the cakes in the pans for about 10 minutes before gently removing them from the pans. Transfer to a wire rack to cool completely; this prevents sogginess.
For the Frosting:
8. Beat the softened butter (1 cup) in a mixing bowl until creamy and light; this will give your frosting its delightful texture.
9. Gradually add in the powdered sugar (4 cups) and unsweetened cocoa powder (0.5 cup), alternating with milk (0.5 cup), until you reach your desired frosting consistency — smooth yet spreadable!
10. Layer one of your cooled cakes on a serving plate and spread frosting generously on top to create that delicious chocolate layer.
11. Stack the second layer atop the first and frost both the top and sides of your cake with remaining frosting for an eye-catching finish.
12. Use green fondant to shape the tractor body, black fondant for wheels, and red for fun details; let your imagination run wild as you decorate!
13. Decorate with fondant pieces until your cake resembles an adorable tractor, perfect for any child’s birthday or farm-themed party!
Optional: Add sprinkles on top for extra fun!
Exact quantities are listed in the recipe card below.
Pro Tips for tractor cake
- Measure Accurately: Use a kitchen scale or measuring cups to ensure precise amounts of flour and sugar for the best texture.
- Boiling Water Trick: Adding boiling water to the batter makes it extra moist. Just be careful not to splash!
- Cool Completely: Allowing the cakes to cool fully prevents melting your frosting and fondant—patience pays off!
- Frosting Consistency: Aim for a thick yet spreadable frosting. If it’s too thin, add more powdered sugar gradually.
- Fondant Handling: Work with fondant at room temperature for easier shaping. Dust surfaces with cornstarch if it feels sticky.
- Creative Details: Personalize your tractor cake with unique fondant decorations, but ensure they’re securely attached to avoid any accidents!
How to Store and Freeze tractor cake
- Room Temperature: Keep your tractor cake at room temperature for up to 3 days, covered with a cake dome or wrapped tightly in plastic wrap to maintain moisture.
- Fridge: If you need it to last longer, store the decorated cake in the fridge for up to 5 days, ensuring it's well-covered to prevent drying out.
- Freezer: For extended storage, freeze the unassembled cake layers (wrapped in plastic and then foil) for up to 3 months; just thaw overnight in the fridge before decorating.
- Reheating: If serving leftovers, allow the cake to come to room temperature after refrigeration for the best taste and texture.
tractor cake Variations
Feel free to let your creativity shine as you customize this delightful cake into something uniquely yours!
- Gluten-Free: Substitute all-purpose flour with a 1:1 gluten-free baking blend for a deliciously inclusive treat. The texture may slightly differ, but the flavor remains rich and satisfying, making it perfect for everyone at the party.
- Chocolate Lovers: Increase the cocoa powder to 1.25 cups for an even more intense chocolate flavor. This variation will surely satisfy the most devoted chocoholics among your guests, making every bite irresistibly decadent.
- Fruit-Filled: Add one cup of pureed fruit like applesauce or mashed bananas to the batter for natural sweetness and moisture. Not only will this add a fruity twist, but it also makes the cake extra tender and delightful.
- Nutty Crunch: Fold in half a cup of finely chopped nuts such as walnuts or pecans before baking. This adds a lovely crunch that contrasts beautifully with the soft cake, creating an enjoyable texture in each slice.
- Vanilla Twist: Replace half the cocoa powder with an equal amount of all-purpose flour and add an extra teaspoon of vanilla extract. This creates a lighter flavor profile, perfect for those who prefer vanilla over chocolate.
- Red Velvet Style: Swap out 0.5 cups of cocoa powder for 1 tablespoon of red food coloring and 2 tablespoons of vinegar. This will give your cake a vibrant color while introducing a subtle tang that contrasts beautifully with sweet frosting.
- Spiced Cake: Mix in one teaspoon of cinnamon or nutmeg into your dry ingredients for a warm spice profile. This adds a cozy, comforting aroma to your baking experience, reminiscent of fresh-baked treats from grandma's kitchen.
- Mocha Flavor: Combine espresso powder (2 tablespoons) with the boiling water before adding it to the batter for a delightful coffee kick. The mocha flavor pairs wonderfully with chocolate frosting, creating an indulgent dessert that coffee lovers will adore.
Make-Ahead Tips for tractor cake

Preparing a delightful tractor cake in advance is a fantastic way to streamline your party planning. You can mix the dry ingredients—2 cups of all-purpose flour, 1.5 cups of granulated sugar, and 1 cup of cocoa powder—with the baking powder, baking soda, and salt up to 24 hours ahead. Store this mixture in an airtight container. Additionally, you can separate the wet ingredients, including 2 large eggs, 1 cup of milk, and 0.5 cup of vegetable oil, and keep them refrigerated until you're ready to bake. Once you've baked your cakes, let them cool completely on a wire rack for up to 3 days before frosting. For the frosting, prepare it with 1 cup of softened unsalted butter and store it in the fridge for up to 3 days; just rewhip it before using. The fondant decorations can also be made ahead of time — simply shape your green, black, red, and yellow fondant into tractor pieces and store them wrapped tightly at room temperature. When it's time to serve, frost the cooled layers and add your fondant decorations for a stunning finish that will have everyone talking!
tractor cake Questions Answered
How can I make sure my tractor cake stays moist?
To ensure your tractor cake is moist, be careful not to overbake it. Bake for 30-35 minutes at 350°F (175°C) and check with a toothpick; it should come out clean but not dry. Additionally, using whole or 2% milk adds moisture and richness to the batter. If you'd like an even more decadent flavor, consider substituting half of the vegetable oil with applesauce.
Can I freeze my tractor cake for later use?
Absolutely! You can freeze your tractor cake after it has cooled completely. Wrap each layer tightly in plastic wrap and then place them in an airtight container or freezer bag. When you're ready to use them, let them thaw in the refrigerator overnight before frosting and decorating. This way, you can prepare ahead for that special birthday party!
What should I do if my fondant is too sticky to work with?
If your fondant is too sticky, simply dust your work surface and hands with a little powdered sugar or cornstarch to help with handling. You can also knead in a small amount of cornstarch until it reaches a workable consistency. Remember to keep any unused fondant covered with plastic wrap to prevent it from drying out while you work.
How many servings does this tractor cake provide?
This delightful tractor cake serves 8 people, making it perfect for children's birthdays or farm-themed parties! If you need more servings, consider making two cakes and stacking them together or cutting larger slices for a bigger crowd.
What are some dietary considerations for this recipe?
If you're looking to make this tractor cake gluten-free, you can substitute the all-purpose flour with a gluten-free blend that measures cup-for-cup. For dairy-free options, use almond milk or coconut milk instead of regular milk and replace the butter in the frosting with a dairy-free alternative like margarine or coconut oil.
How long will the decorated tractor cake last at room temperature?
The decorated tractor cake can be stored at room temperature for up to 2 days if it's properly covered. Keep it in a cool place away from direct sunlight. For longer storage, consider refrigerating it; just remember that refrigeration might cause the fondant decorations to sweat slightly when removed from the fridge—so be sure to allow it some time to come back to room temperature before serving!
Cake
- 2 cups all-purpose flour
- 1.5 cups granulated sugar
- 1 cup unsweetened cocoa powder
- 1.5 teaspoons baking powder
- 1.5 teaspoons baking soda
- 1 teaspoon salt
- 2 large eggs
- 1 cup milk whole or 2%
- 0.5 cup vegetable oil
- 2 teaspoons vanilla extract
- 1 cup boiling water
Frosting
- 1 cup unsalted butter softened
- 4 cups powdered sugar
- 0.5 cup unsweetened cocoa powder
- 0.5 cup milk
- 2 teaspoons vanilla extract
Decoration
- 1 package green fondant
- 1 package black fondant
- 1 package red fondant
- 1 package yellow fondant
Cake Preparation
Preheat the oven to 350°F (175°C). Grease and flour two 9-inch round cake pans.
In a mixing bowl, combine flour, sugar, cocoa powder, baking powder, baking soda, and salt.
Add eggs, milk, oil, and vanilla to the dry ingredients and mix until well combined.
Slowly stir in the boiling water until the batter is smooth.
Pour the batter evenly into the prepared cake pans.
Bake for 30-35 minutes or until a toothpick inserted in the center comes out clean.
Allow cakes to cool in the pans for 10 minutes, then remove from pans and cool completely on a wire rack.
Frosting and Assembly
In a mixing bowl, beat the softened butter until creamy.
Gradually add powdered sugar and cocoa powder, alternating with milk, until desired consistency is reached.
Once the cakes are completely cooled, place one layer on a serving plate and spread frosting on top.
Place the second layer on top and frost the top and sides of the cake.
Use the green fondant to create the tractor body, black for the wheels, and red for the details.
Decorate the cake with fondant pieces to resemble a tractor.
Serving: 1sliceCalories: 350kcalCarbohydrates: 50gProtein: 4gFat: 15gSaturated Fat: 8gCholesterol: 40mgSodium: 200mgPotassium: 150mgFiber: 2gSugar: 30gVitamin A: 300IUCalcium: 50mgIron: 2mg
For a more detailed tractor design, consider using edible markers for additional details.